


Learning how to use a rotating curling iron can make styling feel much easier, especially if traditional curling irons leave you with uneven curls, tired arms, or confusion about which direction to twist. A rotating curling iron is designed to do much of the wrapping motion for you, helping create more consistent curls and waves with less manual effort.
In this guide, we will walk through how to use the Wavytalk Curlmaker Pro, how to choose the right barrel size, which direction to curl, what heat setting to start with, and how to avoid common mistakes. Whether you want polished curls, soft everyday waves, or tighter ringlets, the right technique can make a big difference.
What Is a Rotating Curling Iron?
A rotating curling iron is a hot styling tool with a barrel that turns automatically or semi-automatically. Instead of manually twisting your wrist around the barrel, you clamp a section of hair and press a rotation button. The barrel then wraps the hair for you.
This type of tool is especially useful for beginners because it helps simplify three things that often make curling difficult: wrapping the hair evenly, keeping curl direction consistent, and reducing the awkward wrist movement required with a traditional curling iron.
A rotating curling iron is not just for beginners, though. It can also help experienced users style faster, create more uniform curls, and alternate curl directions more easily.
Why Use the Wavytalk Curlmaker Pro?
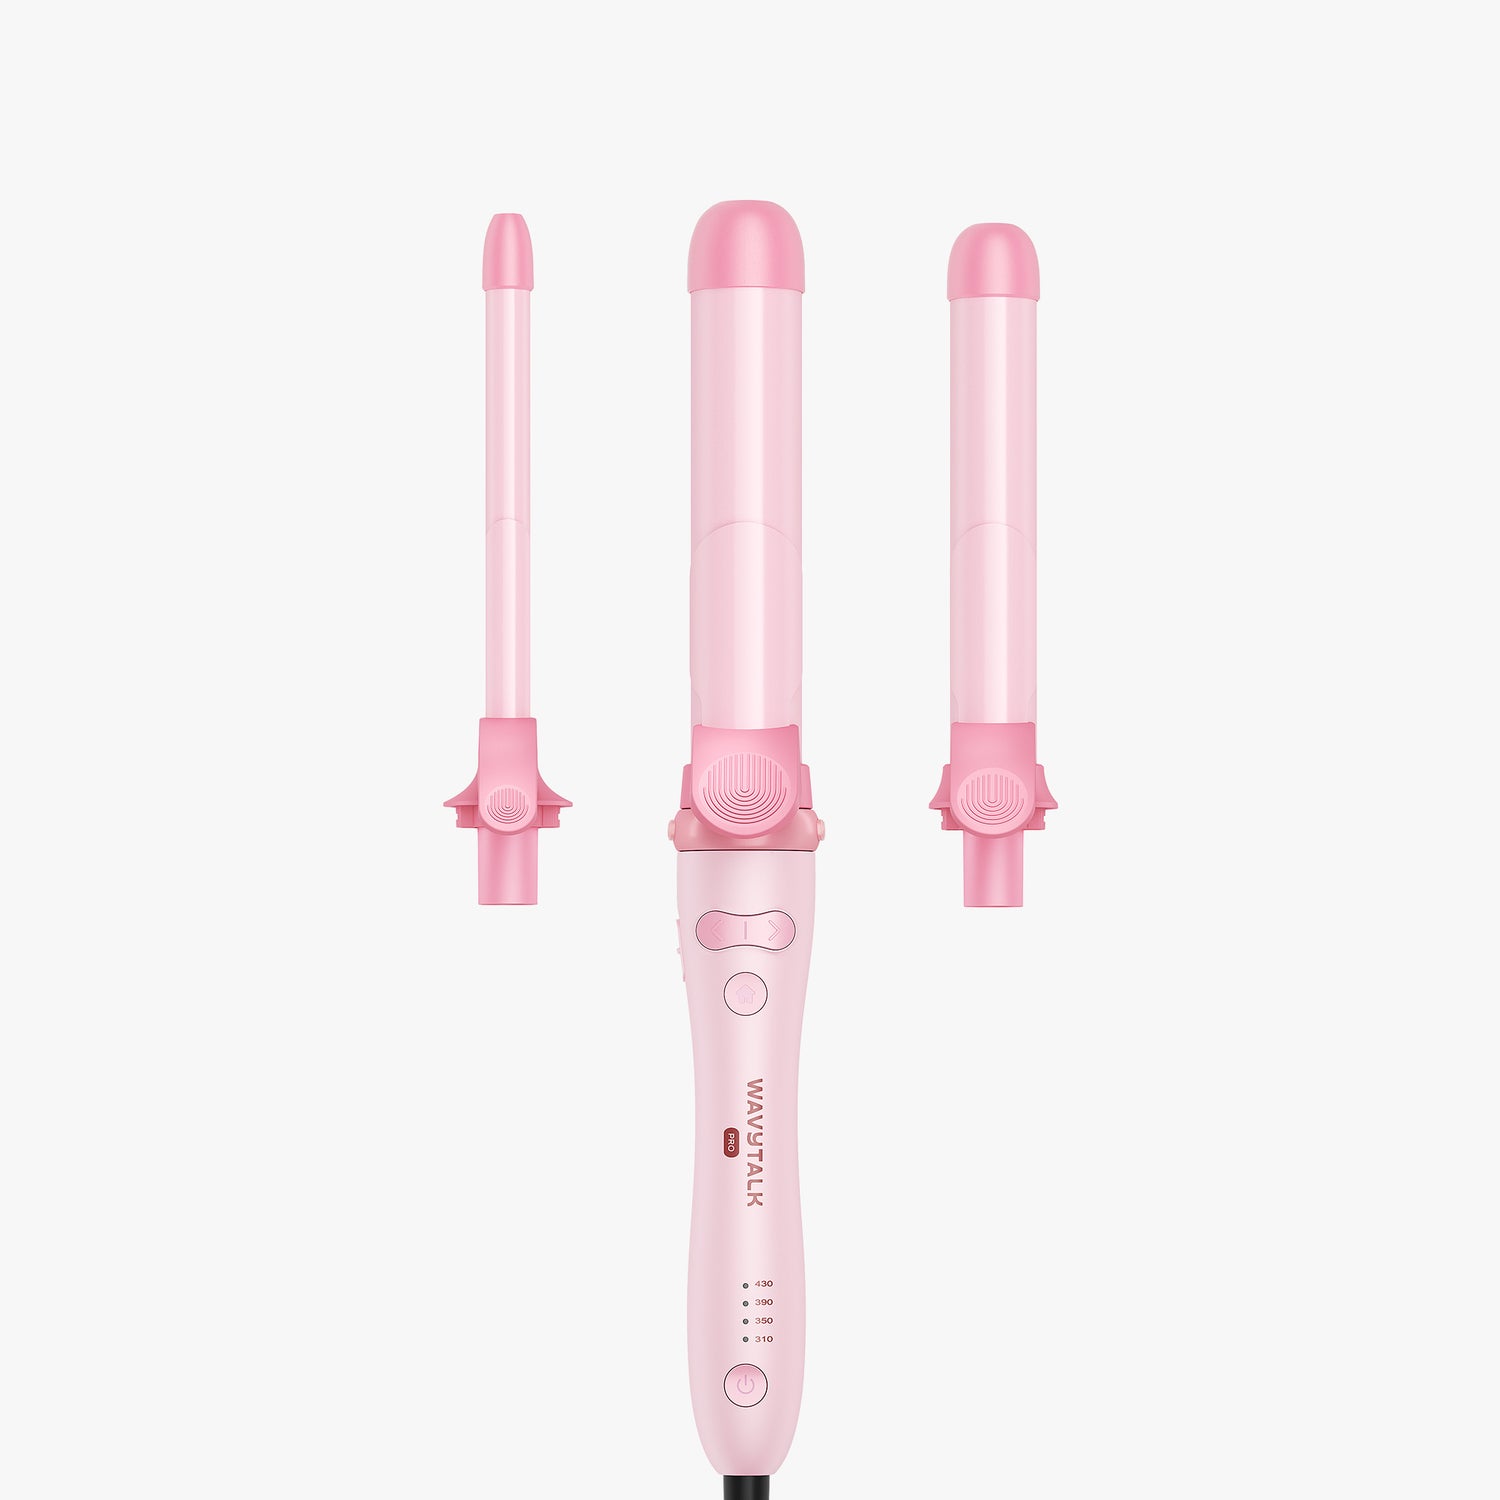
The Wavytalk Curlmaker Pro is designed as an all-in-one rotating curling iron set. Instead of using one fixed barrel size, it comes with three interchangeable barrels so you can switch between tighter curls, classic curls, and loose waves.
The set includes a 0.5-inch barrel, a 1-inch barrel, and a 1.25-inch barrel. It also offers multiple temperature settings, two speed modes, and bi-directional rotation, which means the barrel can rotate left or right. This is helpful when you want face-framing curls on both sides of your head or a more natural, alternating curl pattern.

For beginners, the biggest benefit is control. You can start with a slower speed, a lower heat setting, and small sections of hair while you get comfortable. Once you understand how the tool moves, it becomes easier to adjust your technique for different styles.
Before You Start: Prep Your Hair
The best curls start before the iron ever touches your hair. Proper prep helps your curls look smoother, hold longer, and reduce unnecessary heat exposure.
Heat protectants can help you minimize hair damage caused by high temperatures.
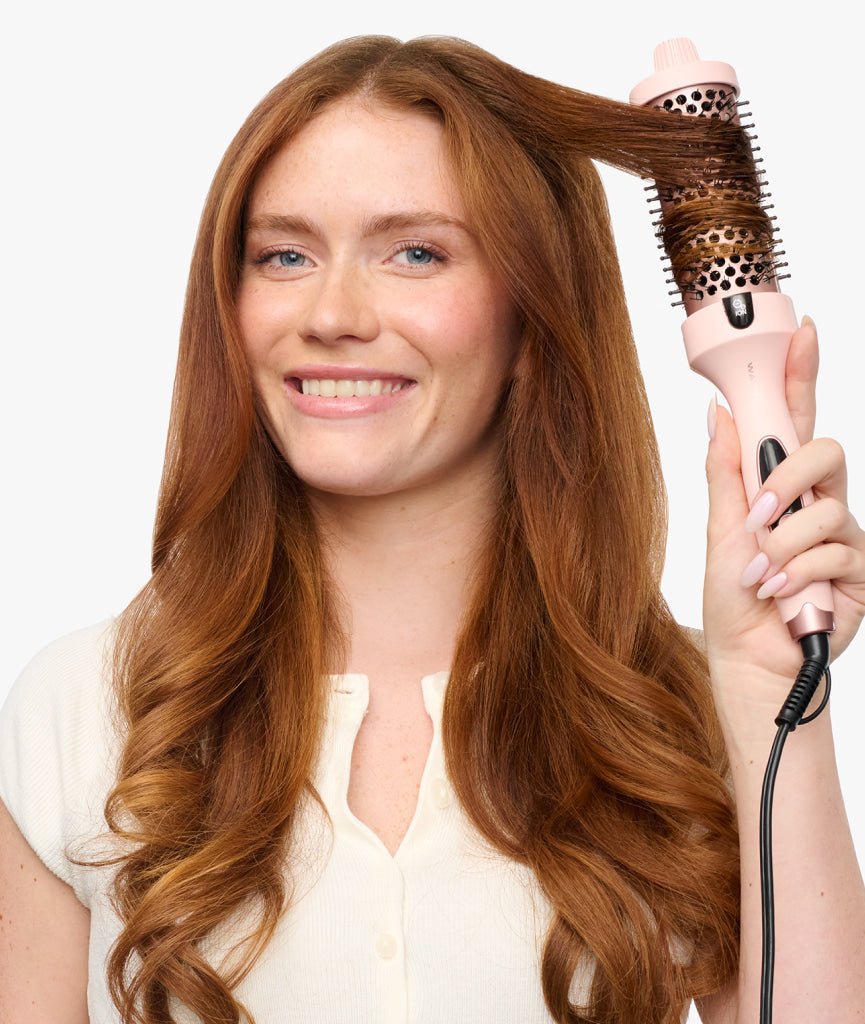
1. Start with dry hair
Use a rotating curling iron only on dry hair unless your specific tool instructions say otherwise. Wet or damp hair is more fragile and can be more vulnerable to heat damage.
Before using the Curlmaker Pro Rotating Curling Iron, please ensure that you thoroughly blow-dry it—or allow it to air-dry completely—before proceeding with styling.
2. Comb out the hair
Brush or comb through your hair so the section can glide smoothly into the clamp. Tangles can make wrapping uneven and may cause pulling. This is especially important with a rotating barrel because the tool is moving for you.
3. Spray heat protectant
When using heated styling tools, it is a wise practice to apply a heat-protectant product. Lightly spray or apply the heat protectant to the mid-lengths and ends of your hair, and allow it to air-dry before curling.
4. Section your hair
Divide your hair into manageable layers. Clip the top sections away and begin at the bottom. Smaller sections are easier to control and usually produce more defined curls. Larger sections create softer waves but may need more practice to wrap evenly.
Barrel and Heat Setting Guide
One of the best ways to learn how to use a rotating curling iron is to match the barrel size and heat setting to your desired result. The Wavytalk Curlmaker Pro gives you three barrel options, so you can customize your look instead of forcing one barrel to do everything.
| Goal | Recommended Barrel | Best For | Image Display |
|---|---|---|---|
| Tight spirals or defined curls | 0.5 inch | Short hair, layered hair, tighter curl patterns |  |
| Classic bouncy curls | 1 inch | Most hair lengths and everyday curl styles |  |
| Loose waves or soft volume | 1.25 inch | Medium to long hair, relaxed waves |  |
How to choose a heat setting
Start lower than you think you need. Fine, fragile, color-treated, or damaged hair usually benefits from lower heat. Thick, coarse, or resistant hair may need a higher setting, but you should still use the lowest temperature that gives you a lasting curl.
A simple rule: if your curl forms well at a lower temperature, there is no need to increase the heat. If the curl falls immediately, try smaller sections, better prep, or a slight temperature increase before jumping to the highest setting.
How to Use a Rotating Curling Iron Step by Step
Here is a beginner-friendly method for using the Wavytalk Curlmaker Pro or a similar rotating curling iron.
Step 1: Choose your barrel
Pick the barrel based on the curl you want. Use the 0.5-inch barrel for tight curls, the 1-inch barrel for classic curls, and the 1.25-inch barrel for loose waves. Make sure the barrel is securely attached before turning on the tool.

Step 2: Select your heat and speed
Choose a lower heat setting if you are new to rotating curlers or if your hair is fine, fragile, or color-treated. Choose the slower speed mode while practicing. Once you feel confident, you can adjust the speed depending on your comfort level and styling goal.
Step 3: Put on the heat glove
Our set includes heat-resistant gloves; please be sure to use them. A rotating curling iron can make styling easier, but the barrel is still hot. Keep your fingers away from the heated surface and avoid touching the barrel directly.
Step 4: Take a small section of hair
Start with a section about one inch wide, or smaller if your hair is thick. Smooth the section with a comb or your fingers. Smaller, cleaner sections usually produce better curls and reduce the chance of tangling.
Step 5: Clamp near the ends
Open the clamp and place the section of hair near the ends. Do not clamp too much hair at once. Make sure the section lies smoothly in the clamp before pressing the rotation button.
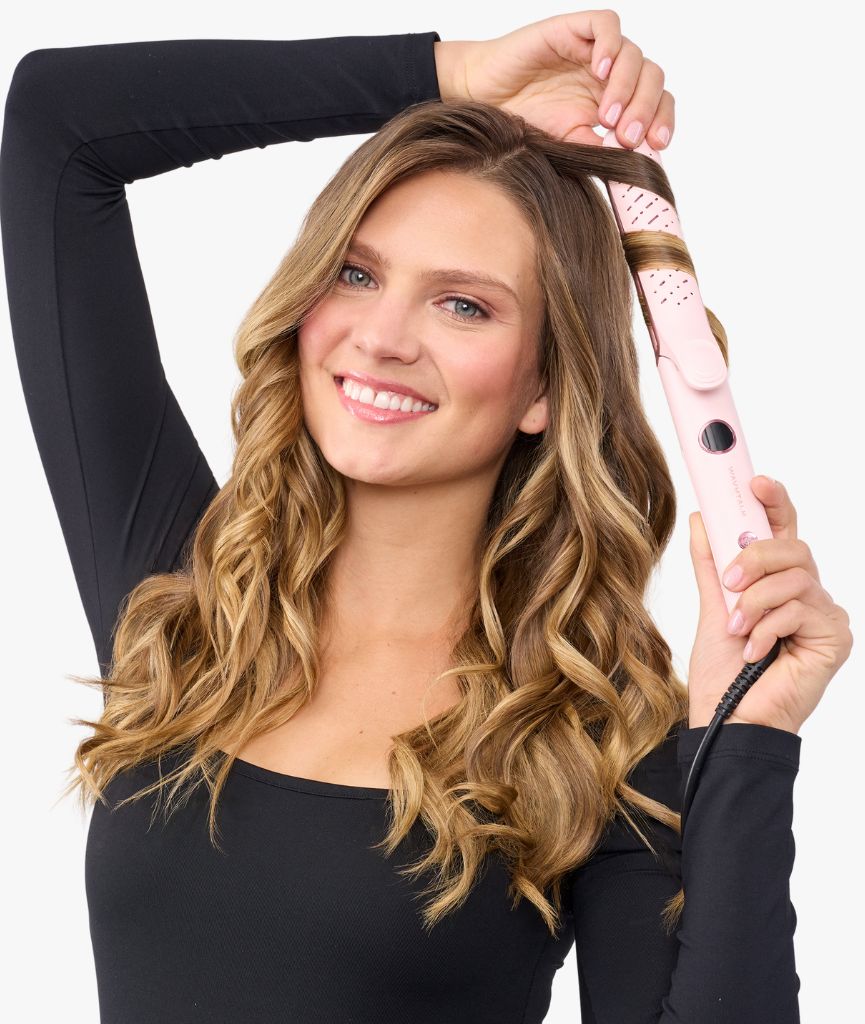
Step 6: Press the rotation button
Choose the direction you want the curl to go, then press and hold the rotation button. The barrel will begin wrapping the hair. Let the hair roll up the barrel smoothly without forcing it. If anything feels stuck, release the button and open the clamp.
Step 7: Hold briefly, then release
Once the hair is wrapped, hold it only as long as needed to form the curl. Start with a shorter hold time and increase only if necessary. To release, open the clamp gently and let the curl slide out without pulling.
Step 8: Let the curl cool
This step is easy to skip, but it matters. Let each curl cool in its shape before brushing, combing, or separating it. Touching curls too soon can make them drop faster.
Step 9: Repeat around your head
Work in sections from bottom to top. Around the face, curl away from your face for a flattering, open look. Through the back, you can alternate directions to create a softer, more natural result.
Step 10: Finish and set
Once all curls are cool, gently separate them with your fingers. For a softer wave, use a wide-tooth comb. Finish with a light mist of flexible hairspray or texture spray if you want extra hold.
Which Direction Should You Curl?
Curl direction changes the final look. Because the Wavytalk Curlmaker Pro has bi-directional rotation, you can rotate left or right depending on the side of your head and the style you want.
-
For face-framing curls
Curl away from your face on both sides. This opens the face and creates a polished, salon-style finish. It is one of the easiest directions for beginners to remember. -
For natural-looking waves
Alternate curl direction from section to section. One curl goes away from the face, the next goes toward the face. This prevents curls from merging into one large curl and creates more movement. -
For glamorous curls
Curl most sections in the same direction. After the curls cool, brush them gently into a smooth wave pattern. This creates a more styled, vintage-inspired finish.
How to Create Different Curl Styles
-
How to create tight curls
Use the 0.5-inch barrel and work with small sections. Clamp the hair near the ends, rotate carefully, and let each curl cool completely before touching it. Once cool, separate lightly with your fingers. Avoid brushing too much if you want to keep the curl definition. -
How to create classic curls
Use the 1-inch barrel for balanced, bouncy curls. This is a good everyday option because it works on many hair lengths and textures. Curl away from the face in the front, then alternate directions through the sides and back for natural movement. -
How to create loose waves
Use the 1.25-inch barrel and take slightly larger sections. Keep the hold time shorter and avoid over-curling the ends if you want a relaxed look. After the curls cool, run your fingers through them or use a wide-tooth comb to soften the shape. -
How to add volume at the crown
For more lift, curl the top sections away from the face and let them cool before separating. You can also slightly over-direct the section by holding it upward as it wraps, then release gently. Finish with a light texture spray at the roots if needed.
How to Make Your Curls Last Longer
If your curls fall quickly, the issue is not always the curling iron. Your prep, section size, cooling time, and finishing products all affect hold.
- Use smaller sections: Smaller sections heat more evenly and usually hold better.
- Let curls cool fully: This helps the curl pattern set before you loosen it.
- Avoid heavy products: Thick oils or creams can weigh curls down.
- Try a light mousse before drying: This can add grip for soft or slippery hair.
- Finish with flexible hold spray: Use enough to support the curl without making it stiff.
- Refresh instead of restyling fully: On day two, touch up only the pieces that need it.
Hair type matters too. Fine hair may need more texture and lower heat. Thick hair may need smaller sections and a slightly higher temperature. Long hair may need extra cooling time because the weight of the hair can pull curls down.
Safety and Hair Health Tips
Safety tip: Keep the rotating curling iron away from your scalp, ears, neck, and fingers. Use the glove when needed, place it on a heat-safe surface, and turn it off after styling.
Hair health tip: Use the lowest effective heat setting, apply heat protectant, and avoid heat styling too often. If your hair feels dry or brittle, reduce heat and focus on conditioning care.
FAQ: How to Use a Rotating Curling Iron
How do you use a rotating curling iron?
Choose your barrel, select a suitable heat setting, section your dry hair, clamp a small piece near the ends, and press the rotation button to wrap the hair around the barrel. Hold briefly, release gently, and let the curl cool before styling.
Is a rotating curling iron good for beginners?
Yes. A rotating curling iron can be beginner-friendly because it helps wrap the hair for you. Start with a slower speed, lower heat, and smaller sections until you feel comfortable.
What direction should I rotate my curling iron?
For face-framing curls, rotate away from your face on both sides. For natural waves, alternate directions from section to section. For a more polished look, curl most sections in the same direction and brush them out after they cool.
Which barrel size should I use for loose waves?
Use a larger barrel, such as the 1.25-inch barrel on the Wavytalk Curlmaker Pro, for loose waves and soft volume. Larger sections and a shorter hold time can make the result more relaxed.
Why are my curls not holding?
Your sections may be too large, your hair may not be fully dry, or you may be brushing the curls before they cool. Try smaller sections, use a light styling product before curling, and let each curl cool completely before separating.
Can I use a rotating curling iron every day?
Daily heat styling can be hard on hair, especially if you use high heat. For best results, use heat protectant, choose the lowest effective temperature, and give your hair heat-free days when possible.
Can short hair use a rotating curling iron?
Yes, short hair can use a rotating curling iron, but barrel size matters. A smaller barrel is usually easier for short layers because it gives the hair enough room to wrap and form a curl.
Should I brush curls after using a rotating curling iron?
Let curls cool first. Then use your fingers for definition, a wide-tooth comb for soft waves, or a gentle brush for a smoother, glam wave. Brushing too soon can make curls fall faster.
WAVYTALK-LIMITED-TIME OFFER
Mid-Year Sale: Up to 48% Off Sitewide
Ready to upgrade your routine? Shop Wavytalks's best-selling hair and beauty tools during Mid-Year Sale and enjoy up to 48% off sitewide.
Plus, get free fast shipping on $25+ U.S. orders. It's the perfect time to save on your next styling essential.
Shop Now

Shop this article: